Tips on Submitting an MRM Paper Written in Latex
September 16, 2019
A few days ago, I submitted a paper to the journal Magnetic Resonance in Medicine (MRM), and it took me over 2 hours just to “correctly” upload my Latex files.
This is my third time submitting a paper to MRM, but I still forget what is the right way to format my Latex files. So I’ve decided to write this post to keep track of the tricks I know. I’ve learned some of them from my colleagues over the years. Hopefully this will be helpful for someone else.
1. Do not use Overleaf’s Wiley template
If you write your paper on Overleaf, you may be tempted to use the Wiley’s MRM template. After all, it is from the publisher. But this is a bad idea because the template actually does not conform with the journal’s author style guide. For example, it does not even have a title page. If you use this template, you’ll have to manually add all the requirements before submitting to MRM.
Instead, you should always follow the official MRM style guide pdf, or use other unofficial templates that conform to the guide. Here’s a bare-bone template I created for myself.
2. Merge all .tex files into one giant file
In general, it is a good practice to separate Latex files into smaller parts, so that they are more organized and easily navigated. I usually have one .tex file for each section, and include the files with the \input command.
But this is a bad idea for MRM submission. Because you can only upload three files at a time:

And each upload can take a really really long time even when the files are small. So having as few latex files as possible will minimize your upload time. With Overleaf, I find that one Latex file is now acceptable to navigate around.
3. Do not use Safari
If you use Safari, then after uploading you will get the following error:

Your files may still be uploaded. Sometimes if you log out and re-log-on, the files will show up. But sometimes they don’t. So it’s better not to use Safari for MRM submission.
4. Upload your main latex file last
You may be tempted to upload your main latex file (or your only .tex file if you follow my advice above) first, because it is the main latex file. But for MRM submission, this can be a bad idea.
That’s because once you designated a file as the “Main Document”, each time you upload anything, the server backend will try to recompile the latex files. This will make your uploading much slower than already is. Even if you upload something irrelevant, like a supporting video, it will still try to recompile your latex files like this:

Instead, you should try to upload all other files, like images, supporting documents, and .bib file, before uploading your main latex file.
5. The Latex Log file is accumulative
When your latex compilation fails, you will get the chance to debug with the generated “Tex Processor Log”.

One thing that can be really confusing is that the log file contains all logs from your previous compilations. So if you try to find errors by scrolling the log file from top to bottom, you may be confused by the errors you’ve already fixed.
6. Put figure numbers in image captions
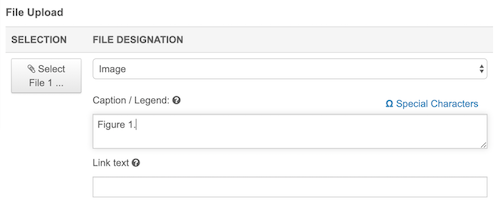
When you upload figures, you will need to retype the image captions from the Latex files in the “Caption / Legend:” box. One thing that will be very helpful for reviewing afterwards is to retype the figure numbers as well. Like this:

This makes it easy to check whether you have put in the right caption for the figure by looking at the thumbnails. Moreover, it will also make reviewers life much easier.
7. Convert PDF to EPS using pdftops
This is pretty specific to my use case, but may be useful if you have your figures in pdf formats.
I make all my figures in Adobe Illustrator, and output them as editable pdfs. Because the MRM submission only accepts .eps or .tiff for images, I need to convert .pdf files to .eps. (Because plots in .tiff are rasterized, I generally prefer .eps.) There is a 20MB limit on each uploaded eps file. The best way I’ve found to convert pdf files to eps in small sizes is using the command line utility pdftops.
8. Use natbib over biblatex for bibliograph
In general, I found the submission system works better with natbib than with biblatex. This is purely anecdotal, but I just couldn’t get it working with biblatex.
9. If all else fails, you can upload a pdf
But if your paper gets accepted, you will still need to upload the Latex files.